
The last blog post I made on development of my game “True King” mentioned how the frame rate was unplayable when there was more than one character on the screen. I said that was worth another blog post to explain how I fixed it. That was four months ago. I’m sorry it took so long, but here it the explanation of why my game was so inefficient, and how I got around it.
60 fps if one character on screen… < 1 fps if 3-4 characters…
I never thought that 60 fps was absolutely necessary for anything but the most competitive of games. 30 or even 15 fps would do for the games I typically play. But I develop on a decent gaming machine (at least it was a few years ago), and I want my games to be at least playable on low-level machines (including my own that I travel with).
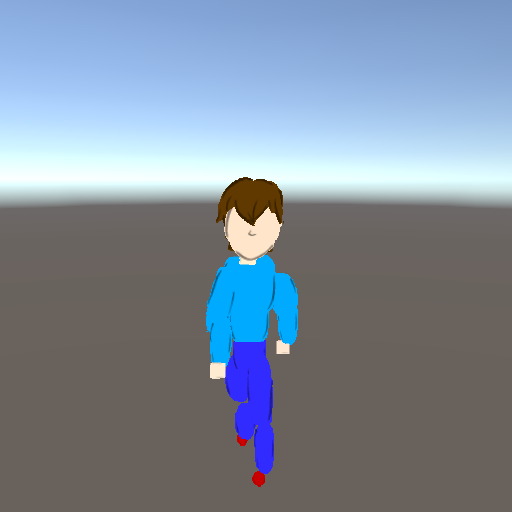
What I saw in “True King” was far worse than that. I had four characters on the screen, to represent a small strategy map early in the game, to see that the characters would still animate properly. I was getting less than one frame per second, my computer slowed to a crawl, my mouse barely registering to pause the game to see what was wrong. And using Unity3D’s profiler tool, I saw it was entirely because of my “3D Cel Animation” technique.
To fully understand what this technique is, if you haven’t visited my website before, I highly recommend checking my original video tutorials and my recent ‘workflow’ test scene I used months ago. Basically, I am animating a 2D character in 3D space by having drawn hundreds of 2D sprites from different perspectives, and animating/enabling each as I rotate the player camera. But I had already released two games with this technique (one of which had at least two live characters), and I had video of one character for “True King” last year. Why is this issue occurring now?
Part of the problem is that my newest evolution of the animation in “True King” is using a perspective-sphere around every body part, where my previous games only used a few around the center of the body, representing the entire character. That means while a character in my previous games used 1-3 perspective spheres, “True King” is using about 20 for one character. The trade-off is that I reduce the sprite resolution of the body parts, so it doesn’t use “all the RAMs.” But the physics and animation logic to control which perspective plane is visible is still worse off, and again, Unity3D’s profiler tool pointed at “Physics” as the culprit. If you haven’t guessed, that profiler tool is a life-saver.
But I was still confused. Almost five years ago when I was still experimenting with this animation technique, I distinctly remembered having tested with hundreds of simple characters on screen at once. They weren’t animating and the background was simpler, but the physics should have been about the same. And that easily reached 60 fps and above. The only difference between the two was that, long ago, I used the api call “Physics.Raycast”, but in “True King” I was using “Physics.RaycastAll.” I understood RaycastAll would be less efficient, but by that much?!?
… it turns out, yes. I was prepared to test many other creative solutions, but the root cause was in using “RaycastAll.”
Raycast and RaycastAll are useful functions. They let you draw a virtual line between two points with a direction. Raycast returns the first object that line ‘hits,’ while RaycastAll returns ALL the objects hit. Why was I using RaycastAll? Because the perspective planes all were of the ‘plane’ object type with a default mesh collider, such that physics and rendering only occurred on one side of the shape, the side facing the camera. This meant the raycast line had to come from the camera to the center of the player, and logic said that the perspective plane I wanted visible would be the last plane hit in that line. Because I had multiple perspective sphere’s close to each other, it seemed unavoidable to not explicitly check what the line had hit.
But it was worth the effort to try. About a week after being prepared to cancel development altogether, I had the game back up at 30-60fps, and the graph below gives an idea of my test results.
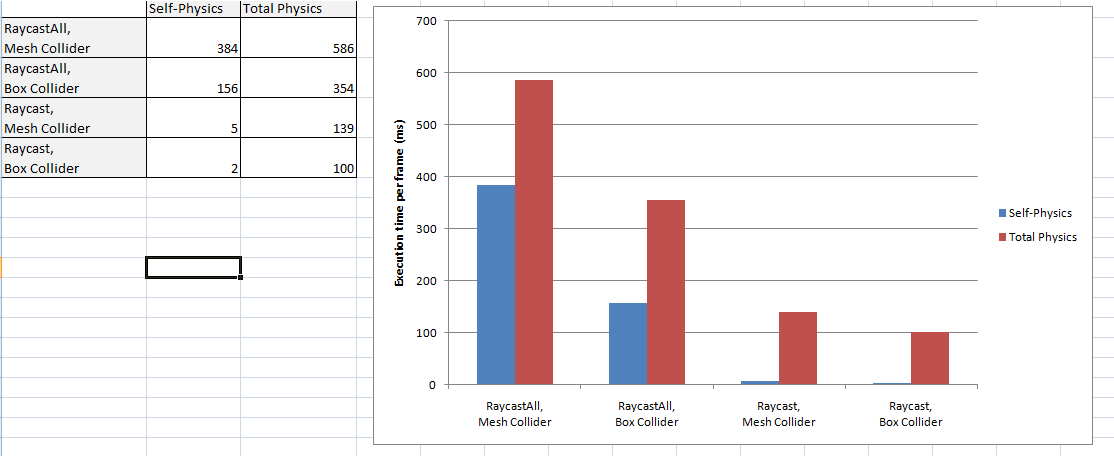
Test results, comparing Raycast VS RaycastAll, Box Collider VS Mesh Collider
Big difference, eh? For one thing, it shows using Raycast instead of RaycastAll can see an improvement to using only 1% of the previous computation time. But this required me to be able to cast a ray from the player to the camera, the opposite of before, and to the back of the perspective frames. For collision to register properly, I had to replace the colliders on each frame to a ‘box collider,’ which was supposed to be more efficient than a ‘mesh collider’ anyway. Sure enough, using ‘box collider’ let me use 40% of the computation time I had before. Notice the final result of ‘total physics’ did not quite follow this improvement… I suspect the game engine routed available physics to other parts of the game when the player’s animation no longer needed it.
So that’s it. I changed the collider on most of my game objects, I updated the logic to use Physics.Raycast instead of RaycastAll, and I also made a global animation manager to better control how many things were animating at any given time. FPS is good now. I should have done this from the start. If you were wondering about using Raycasts, maybe this post helps you.